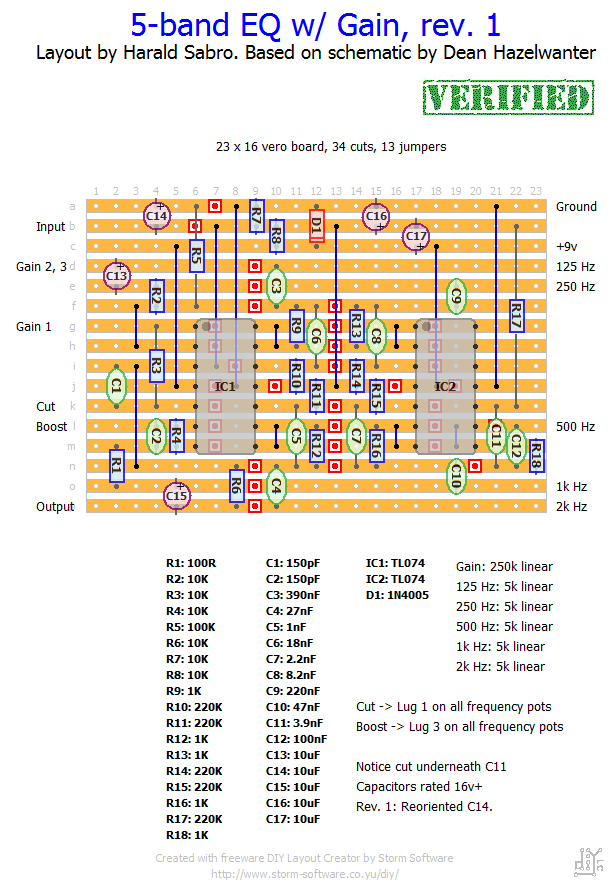
I made a vero layout of the equalizer project at generalguitargadgets.com, and opted for the 5-band variant with an added gain control rather than a 6-band variant. I’m fairly confident the layout is correct as I’ve gone over it several time, and I’ve finished the board.

There are so many pots I haven’t yet had the time to attach them and test the circuit. Will have to do that once it’s time to box this thing.
Update: Boxed the EQ today and realized I had the positive and negative pins on he TL074s swapped (layout has been updated). An hour later I also discovered the gain pot had gone bad and needed a replacement. Still missing knobs and labels, but works like a charm. After having played with it for a while I have to say I really like this thing.


Update (01.04.2012): So this has been up for a long time with a small mistake. After having been reminded time and time again I finally updated the layout. Sorry people. Revision #1 now has C14 with the correct polarity.

Hello,
how wiring the -9volt bipolar +9v/-9v pump on EQ
the 1’s and 3’s off the pots I see but from the board marked 250Hz, 500Hz etc…do they hook to the 2 lug of each pot.
Great you two were able to solve it with me being so slow to respond 🙂
Hi Alec,i did it today,and works great now !!!
Thank you !!
Hi Fr-FR. Used the -9volt bipolar +9v/-9v pump as on this site somewhere and wired Strips A,B,C as -9v, Earth, +9v. I also struggled with the plain +9v wiring and couldn’t get any joy at all but found this a good work-around.
Hi Alec,
What kind of charge pump,9v to 18v ?
Hi there. Run mine off a charge pump I added. Works great. One battery or daisy chain. Many thanks.
Thanks for the answer Harald,
At my first try,i forgot de 1N4005,is that it could cause damages ?
Hi Fr-FR. You should be able to hook up the vero to +9v and it should run fine with other effects. It looks to me that the advice you’ve been given if related to the GGG PCB boards; I basically set up my vero to use the “A” / “B” option (there’s no “C”). R7 and R8 form the voltage divider for the bias voltage, you don’t have to wire this in any way.
Hope that helps.
I replaced C13 by a jumper,it works,but still not daisy chainable.
I have find this at diystompboxes :
Quote,from Slacker:
“If you want to run this on 9 volts sharing a power supply with other pedals I think you just need to do a couple of mods.
1. Disconnect point C from ground, and use point B as ground instead. That makes your negative battery terminal or negative supply voltage ground, so the pedal will work with others on the same supply. Point C is now your standard 4.5volt vref like you get in most FX pedals that use opamps.
2. Connect the input and output jack socket sleeves and the bottom of the final 10k resistor to point B, so that they are connected to the new ground. If you’re using the GGG layout you can do this just by moving the jumper that normally connects those to point C to point B instead.
3. Flip the input cap so the positive end faces the 100k resistor and remove the 10uF cap in the feedback loop of the IC1b and replace it with a jumper. That will correctly bias the opamp now that it’s referenced to 4.5volts instead of ground.”
These mods works with the GGG kit.
On your vero,it seems to be : “A” is layout Ground, “B” is layout +9V, and “C” is strip b7-b23.
Maybe revelant with your vero ?
Hi Harald,
I built this and the EQ works great,but i have a poping issue and the effect doesn’t works with a daisy chain(big volume loss at switching and doesn’t sound good),need to be alone on the DC.
Any idea ?
Hi Jeff,
Yes, you’re right. I didn’t think ahead when drawing the layout and should of course have matched the component labels. At least I do this for all new layouts.
If you want to change the frequency each band operates on you need to swap out the same two capacitors on each band. I didn’t label them correctly, but you’ll still be able to find the 150n and the 22n on the layout that goes with the first band. And you can locate the two other pairs the same way. Hope that helps.
I started off by doing some process of elimination and I think I can work it out. but I’d love to here any useful ideas.
Thanks,
Jeff
Hello. I appreciate all the hard work you’ve done so far on this project (and all of your projects for that matter!). I am interested in building a four band EQ version for my bass. I will be using custom values (taken from one of my amps) for the frequency bands and simulated inductors. I know what I need to do to mod it but I’m lost when trying to find the values to swap on your layout. The components are not labeled on the schematic so I’m having trouble comparing the two. Could you offer any advice on how to read your layout so I can match the components up to the schematic and make the swaps I need?
Thanks,
Jeff
Sorry to hear you’re still struggling with this one. Hate to be a drag, but I didn’t alter any schematic; used the one you can find here (left the 62.5Hz stage out): http://www.generalguitargadgets.com/projects/18-eq/46-6-band-graphic-eq
Harald, is there any chance you’ve got the altered schematic that you used?
Thanks for the reply Harald. I’ve tried C14 both ways and yes this is Rev. 1 that I’m using. I measured the voltages on the pins of the ICs and pins 5,6,7 on IC1 have almost full supply voltage going through, which isn’t right and I just cannot figure out why. There are no bridges anywhere because I use a small hacksaw between the tracks and they’re absolutely clean.
Sorry to hear that, Ásgeir. By chance did you build this based on the revision 1 layout, with C14 reoriented with negative side towards input? If not so, give this a try. Other than that there’s little I can do, and I’m afraid I no longer have the effect around, which means these are the images I have.
Have you tried an audio probe to check where the signal disappears? I know I sound like a parrot, but check out the “debugging” section just in case.
Maybe it’s time to do an updated EQ…
Hope you’re able to solve it!
Hey there Sabro. I’m afraid this layout does not work. I’ve built over 400 pedals on vero so I’m not lacking skills at all.
I’ve built this twice now with the EXACT same problems. There’s a loud pop when engaging the pedal and no output. The first board I built was like I build them normally, I load all components and solder but then I did the second board and soldered one component at a time and checked to make sure that it’s absolutely spot on. The cuts are correct as well as the links. I’m using all the right components and the wires are all in the right place. I wired the pots just like you did, daisy chain all lugs 1 and then all lugs 3. I used lugs 2 on each frequency pot on the board. The gain pot has lugs 2&3 soldered together. I measured all the pots before using them and they all work. I’ve tried swapping out the 3PDT.
Could you please post better photos of the circuit you built because yours apparently works but mine, that looks identical to yours, doesn’t.
Thanks!
Great, Juan 🙂
It was wrong with this, so sorry. I had a short. Nice pedal! Thank you a lot Harald for your help. Cheers from Spain.
Hi Juan, sorry to hear it’s not working right. But on the bright side now you get to debug, and that can be fun too 😉
The last three pins on IC2 aren’t in use, so I wouldn’t worry about them (in truth they should be grounded, but I didn’t know that when I did the layout).
The pedal can be powered by +9v DC (it’s actually up to you how you want to wire the DC jack, but center ground is almost universally the standard these days).
I suggest you have a look at the debugging section, start with a visual inspection.
Hi, I’m making this EQ, but I don’t have sound. I have very low voltage at pins 14, 13 and 12 (about 1v) on the IC2, it’s normal? Maybe the IC2 it’s fail. The pedal can be powered by a 9v dc power, center negative true? Thanks!
Thanks Harald!
Copy of response on the Klon post.
You can use the 330n in both circuits, but it will change the frequency response, by how much I don’t know. Alternately you could use the 330n in parallel with a 68n for a total capacitance of 398n; pretty close, but it might be a bit clumsy when it comes to the physical size of these things.
Harald, I am about to build this but can’t get 390nF from my supplier. Which value do you suggest I substitute with? I have 330 and 470.
I posted a similar question on the KlonCentaur page.
Thanks
Lee
Solved the whine, it was actually a misplaced jumper, but thanks for the clarification on the voltage divider! It still doesn’t work quite right, sounds like it’s breaking up somewhere, like a dying battery, but I’ll test that and try to find a solution.
The only thing I was really boggled about was the voltage divider but that’s clear now.
Cheers!
Luka, the voltage divider is correct when using a single +9v power source. I believe the schematic was drawn primarily with a bi-polar +9v/-9v power source in which case ground would be used for bias voltage.
The whine you’re getting isn’t uncommon and you need to treat this as a high-gain effect; i.e. keep wires short and away from each other as much as possible, maybe use shielded wire for the input and output etc.
One thing I don’t understand regarding this layout: Based on the schematic, when looking at the signal path, the + input of the first op amp, the 150pF after it, and the 10K right before the output are connected from the signal path to ground, but in the layout they’re connected to what seems to be a voltage divider.
I’ve just built this, and I get almost no signal through, but get a high pitched whine. The EQ portion works, as I can tune the whine with the EQ and see that all the parameters work, but I have no idea where to start debugging.
Sorry it doesn’t work.
Doesnt work
So I WAS right!!! ;D Just kidding around. I still don’t understand how no voltage can travel, especially towards something that is spitting out voltage. Visually speaking I am imagining the input of the op amp having 4.5 volts coming out? Of course that would make no sense logically. So All I can think is, this 4.5 volts is not coming out, but contained in the opamp and flowing past the input leg, like a river, therefore creating a suction to pull the weak signal in from the input. But how does this weak signal become loud and clear over the voltage which has noise and is 4.5 times greater than that signal to begin with… Every time, I try to work something out it raises at least one more question, no worries, that is for me to figure out eventually. I know this isn’t theory class, so don’t mind me, thanks again for your help.
I believe it’s because the input comes in at ground reference (0v) while the opamp input sits at bias which is +4.5v, i.e. the electrolytic needs to be oriented based on these two voltages.
It’s ok Harald. As frustrating as it was for me, I learned quite a bit. I still appreciate your hard work and am eager to build more and see what else you have in store. That is, as long as you’re passion, for dissecting and reverse engineering these circuits, warrants it. I have another problem with the logic of why this cap is reversed, though. Doesn’t the input flow from where it says input, toward the only direction to go, which would be in this case, the electrolytic cap….How does the signal flowing backwards through this cap, instead of the other way around, cause it to work properly?
Disclaimer:*may need to eat your wheaties before and after comprehending the next statement* 😀
As a guess, I would say that since the signal from the guitar is passive, it could be treated as positive or negative and therefore, the signal coming in, is negative which would go into the op amp, inverted(-), which then converts it to non inverting(+) during the amplification process
Still can’t wrap my head around how the signal flows right if the tip really is inverted or treated as negative, then how would the real negative from the power supply flow into the guitar then into the board, unless there is some sort of way that the op amp pulls like a magnet from the input……Yep, I agree, sounds completely crazy. Anyone care to shed any light on this?
Thanks for being persistent, Jeff. I updated the layout today and I’m really sorry you had to go through so much to get it working.
Ok I know I have posted ALOT on this one, lol. I may be way off base here but, for you newbs like me, if you do not put the c14 to positive side facing up like blackrain and agung have stated, it will short or blow or cause c13 to be intermittent, so if you did, better of changing both. Mine worked like I stated before but after a couple of minutes, id get distortion then no signal. Turned it off for a while and when I turned it back on, same thing, then it comletely died. Changed both of these caps and so far it has worked like a charm, maybe Im wrong about c14 causing this to c13 and perhaps got them mixed up one time when I was testing them, who knows. I also verify that it does not work properly as noted in the layout. Peace.
I tested C13 with my DMM and it was fine. I started pushing hard on each component and I noticed that one giving me a change. Changed it for another and it works great! So much time over this because I put all my faith in my DMM and didn’t bother with the chopstick test!
Alright. I thought I fixed that. Thanks for the heads up.
hi harald,
i built this eq and 3 band parametric eq and all works fine..but your vero layout (5 band eq) for c14 is reverse,.(+) polarity must be top position on the vero,.
thanks
Some time had passed since I looked at your gut shot and the older comments. So nevermind about the cap direction question. Ill try to remember what the guy said about C14, though. I guess at this point Ill recheck the values of the caps in my drawers to make sure some values are not wrong on the mylar and ceramics. Although this is an important piece of the effects chain, if nothing pans out there, I’ll just move on to another one of these tasty projects. Peace.
Ok, I noticed tonight that after taking off the electrolytics and testing them, I put C13 in backwards. I reorientated it to the specs and now it does not work at all. Although it seems unlikely looking at the current flow of the board, would the positive markings on the layout actually indicate the striped side (negative) of the caps?
Thank you for taking some of your precious time to help me. I do not expect you to figure out things for me and I really appreciate the advice you have been willing to give. Most of all Thank you for this website and all the time and effort you put into keeping it up and reverse engineering pedals and making it available so newbs like me can learn by doing….
On another note, I did what you suggested and the gain pot does not sweep correctly, from 0-15k it is barely audible from 15-35k it sweeps “correctly” but after that point there is not volume at all. I already changed the gain pot to verify if it was bad. The only other thing to point out is in that 15-35 sweep range there is scratchiness at the 15k and 35k points. Perhaps I made an error in assuming 50v electros and 100v mylars would be ok in these 9v circuits as the resistance difference would be too small to matter. At this point I am lost as to what to do since I am not sure that is actually the problem.
Well they are rated at 50v, I wouldn’t have thought the difference of 16v to 50v ratings would cause this, but maybe so! hmmm. I am using a 1 spot with other pedals hooked up, I hooked it up directly one time and same thing, but you are right, it does sound as if it is not getting enough juice. I will try it when I get a chance.
Ouch. I’m sorry to hear you still have issues. The wiring you describe sounds OK. This isn’t something I’ve thought through, but what if it’s a headroom issue? What if you try feeding it +18v (make sure your caps and electrolytics are rated 25v or higher), no guarantees.
Ok I built another board, used the old enclosure and its jacks pots and wires. I thoroughly checked the wiring patterns to make sure nothing is shorting out or wired wrong… Tested the pedal and it does the same thing, low signal strength with distortion. Question, I see the boost and cut wires connected to one pot, while other wires are wired in series from end pot toward that connection. Mine is also wired in series but instead of connecting the boost and cut wires to a pot on that end, I connected it to one of the midrange pots, I guess I was thinking it would be more efficient there and I assumed this would not cause an issue? Also, I have ground from 9v jack going to board, and at that spot I have ground wire to center 3pdt which grounds the LED and another ground wire which starts from original ground point on board to the sleeve on the output jack, then a wire from that sleeve to the input sleeve. I assume this grounding scheme is ok? *scratch head* If nothing turns up, I Guess it’s time to scrap enclosure, jack, pots, and wires and head back to the drawing board!
Hi Jeff M. I have to admit I did this one a long time ago and I might have mixed the wiring of the gain pot without having updated it properly, but the distortion you’re talking about sounds wrong. Hmm..
As for the 5 bands they’re each either boost or cut a portion of the audio frequency spectrum. At noon/halfway they’re set flat, neither boost nor cut, but if you lower all of them you’ve effectively reduced the volume of the entire frequency spectrum. Think of each of the 5 controls as a frequency specific volume control.
Hope this helps a bit.
Hi, I just built this and I have gone over it a couple of times and can’t seem to get it right. It works, but the gain seems backwards, I am using a log pot for now and that may be why? But its distorting and if I turn the gain all the way down(which makes it louder) it almost acts like a distortion pedal with a dead battery. The Eq Band pots seem to be working, however if I turn them all down, then you cannot hear it unless you crank the volume way up. Anyone else run into this? I may just have to scrap it and start over, sigh, I really felt I was gonna get this one on the first try seeing that it was my fourth build from this site and I always seem to run into problems. I fully understand how important troubleshooting on my own is and I was going to come back here and tell you about the GGG Schematic being different, but now I see why. Peace.
The layout doesn’t match the GGG schematic exactly. Opamps 1 and 2 of IC1 is used for the input and output buffer/gain stage, and opamps 3-4 on IC1 and opamps 1-3 on IC2 are used for 5 EQ bands. The last opamp on IC2 is left unused. I built one from this layout and it works fine so I’m pretty sure it should be OK, but never say never.
You will definitely have to change caps on the five bands to shift them towards a spectrum useful for bass, but I’m not sure what that might be. As for the input and output caps they have to be large enough to let all bass frequencies through and not just guitar ones, but the 10u already there may be enough.
Hi Harald,
is it really working?i’ve checked with the schematic from GGG and there’s a few connection different from yours.
pin 14 & 13, pin 1 & 2 should be connected together for both IC refer to the schematic. Cut point to pin 10 and boost to pin 9.
can u help to clarify this for me…Thanks..
thanks a lot but, just changing caps? should i change the input and output caps? is that necessary?
I can’t see why not. You should change the caps to work on bass frequencies instead, yes. I don’t know what would be good frequencies though.
can i make this one for bass guitar? with changing caps?
I would think that working a film cap between the gain and the footswitch would reduce the the “popping”, but it may delay the switch over a little. I haven’t looked at this circuit, but generally, anti-pop caps somewhere between the power and the switch will reduce it. Values and placement in the circuit…not sure. There is a lot more experience on the board than I have, but someone will be sure to know. I’m interested in this box myself. I’d also be interested in knowing what the general cost of building one from the ground up would be. Ideally I’d like to have it powder coated and apply decals…then clear coat it, but the cost of the build itself would be helpful.
Thanks!
It have poping noise when push foot switch.
Is it posible to get rid out this poping noise?
Thank you for your response..Harald..
I reversed C14 capacitor and now it works…
I love this pedal….
thank you.
Ah, see what you mean now. I agree, it looks as if I’ve connected C14 the other way around. Since C14 is used for coupling the input signal I’d wager a guess and say either way will work. Try it the correct way and see if it works, if not then reverse it (this does not go for all caps, but this one is OK).
Hi. Harald..
I’m not good at english. so you didn’t understood that my meanning..
Plus(+) directoin of C14 capacitor on your veroboard layout is bottom side… (you marked + sign at bottom)
but C14 capacitor of picture that you made pedal, plus(+) direction is top..
it’s different vero layout and pedal picture that you made.
please checkout C14 capacitor plus(+) direction of you made pedal and vero layout..
My earlier layouts all suffer from me not having realized the electrolytics actually have a shaded area to indicate the negative side. Always go with the (+) sign.
Hi, Harald….
I have one question to you…
C14 capacitor of your veroboard layout.. + is bottom.. but your picture of you made pedal… + is top…
What is the correct direction….??
I assume by ‘tagboard’ you mean those board you find in old fender amps etc. and not what I would call perfboard (similar to a vero board, but with copper pads instead of whole strips). I have no idea, actually, as I’ve never used tagboard before, but I’m guessing the ICs would be a challenge.
If, on the other hand, you mean perfboard then I’m sure you can do it. You may have to re-think the layout somewhat, but you can probably use the vero layout as a starting point.
If this is your first build I would consider doing a small and easy circuit with a small parts count first, both to get you comfortable, give you a little bit of starting experience and hopefully also boost your confidence. I’d rate the 5-band EQ as an intermediate difficulty build.
How hard would this be to make with tagboard? I plan to try but would like your opinion. Thanks.
It’s on my to-do list and has been for quite some time.
can you upload some sound samples of your 5 band eq.
Thank you.
It’s perfectly possible, but would require some amount of work. You either need to create a separate, small vero board with the 6th band and wire it to the existing vero board, or you need to redesign the vero layout to accommodate the extra band. You’ll find the schematic at http://www.generalguitargadgets.com
Is it possible to add a 60Hz pot and to make this a 6 band EQ?
I’m sorry, but it’s a bit difficult for me to help you out here. As a start I suggest you visit http://www.geofex.com and read the excellent “Guitar effect debugging” section. The freestompboxes and diystompboxes forums in the links section here are also recommended.
I hope you’ll be able to solve the problem and get it working.
Hi there..
I buiLt that..
So far its stiLL not work..
I change the dioda with 1N1418..
And the caps aLL in MKM..
Can u heLp me..
Thanks..