Overview
StripboardCAD is a tool for drawing circuit layouts appropriate for stripboard or veroboard. There’s no auto-routing or other kind of magic; you can almost think of this as a glorified and highly specialized drawing app. This is a tool for you to take a schematic representation of an electric circuit, and turn this into an easy to follow layout diagram with helpful parts lists, that can be used as a manual for building circuits, DIY or otherwise.
File management
This is where you start out when using the app, and where you’ll manage all your files, be it circuits you’re working on or finished layouts.
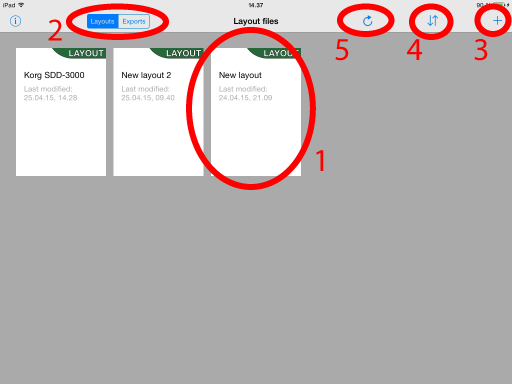 1. Each item in the main area represents a file. When first starting out this place will most likely be just an empty space. Based on the file type selection (described next) you’ll either see your layout files (these are the files you create and edit in order to produce finished layouts), or your exported files (these are images or document representations of your layouts, the end result, that you can share with others, print to paper etc.). Tap a file to open it either in the editor or as a preview (based on the type of file).
2. The file type selector allows you to swap between listing your layout files and listing your various output files.
3. Create a new layout file. This brings up a dialog asking you what you want to name your layout file. The name has to be unique, is only used for storage purposes, and you can rename it later if you want to.
4. This brings up a range of sorting options. Note that the sorting option you choose affects both the layout files and the output files.
 5. Tapping this triggers an iCloud synchronization, as long as you have iCloud enabled for the app that is. iCloud tries to keep up with changes, but can be a bit slow at times. This is for when you want to speed things up a bit.
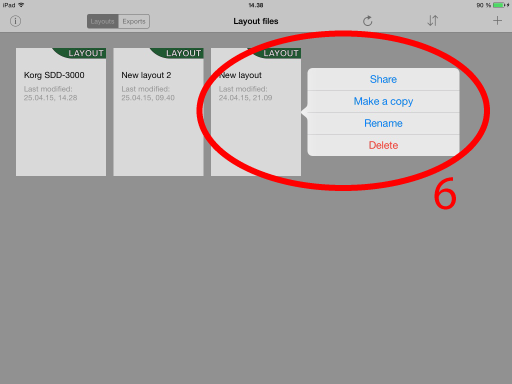
6. Holding your finger on top of a file for a little while brings up a context menu with a few file related actions.
- Share – Allows you to hand over files to other eligible applications; e.g. you can send your new layout to a friend in an email, or store your layout in dropbox. In case of an output file, you can also have it printed if you have a printer that supports AirPrint.
- Make a copy – Create an identical copy of the selected file, with an appropriate filename.
- Rename – Brings up the same filename dialog that you saw when creating a new file. Allows you to rename your file (but does not affect the layout title, which is defined in the layout editor’s metadata menu).
- Delete (*) – Delete the selected file. You will get a warning dialog asking you if you really want to delete the selected file, and it will only be removed if you confirm this dialog. NOTE: If you’re using iCloud, deleting a file on one device will also remove it from all your other iCloud enabled devices! Once deleted it is gone.
(*) Tip: Once you’re done with a layout it can be a good idea to save a separate copy in Dropbox or equivalent, or by mailing it to yourself. The layout files are typically very small in size, so shouldn’t take up hardly any space. As for the output files, you can always re-create them as long as you have the layout files. Having the extra backup could prove a blessing if disaster aver strikes.
Layout editing
This is where you do most of the design work, laying out stripboards with associated components and labels, assigns values and eventually generate an image or PDF-document of your work.
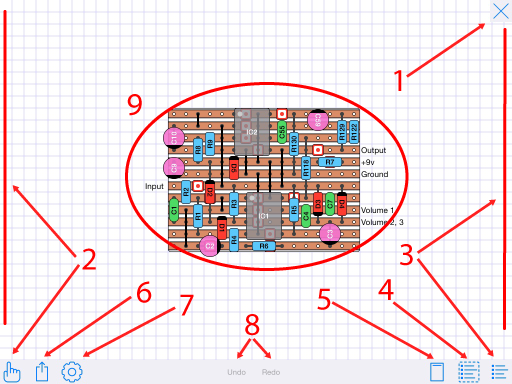 1. First off. If you want to close the layout you’re currently working on and go back to file management, you tap the “x” in the upper right-hand part of the screen. Note that this will flush the undo/redo stack.
2. Tapping this icon, or sliding in from the left edge, brings out the component selection menu.
3. Tapping this icon, or sliding in from the right edge, brings out the on-board parts list menu.
4. Tapping this icon brings out the off-board parts list menu.
5. Tapping this icon brings out the layout metadata menu.
6. Tapping this icon brings out the export menu.
7. Tapping this icon brings out the workspace settings menu.
8. When you make changes to your layout the undo and redo buttons will be updated accordingly, and tapping these allows you to perform undo and redo operations. Note that all previously recorded undo/redo operations will be reset when you close a layout.
9. The rest of the workspace area is for you to draw your layout on.
Drawing components
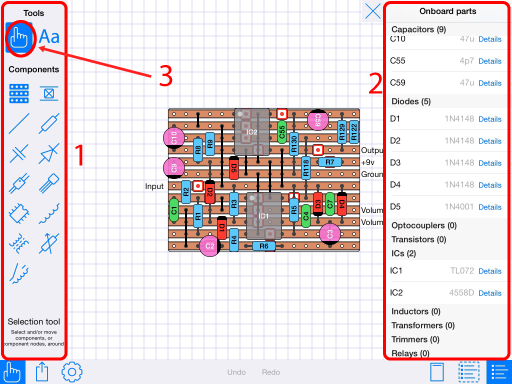 1. Select the type of component you want to draw next. Different types might require slightly different kinds of motion when placing them on the workspace. There’s a short explanation text at the bottom of this menu to help you getting started. Note: Based on your workspace settings (explained further down) after having successfully drawn a component the selection tool (3) might be automatically selected for you.
2. Each component you add to the workspace will also end up in this on-board parts list menu. This is where you keep track of all your existing components, assign them labels and values, and so forth. As the number of components grow this list becomes scrollable.
3. The selection tool allows you to select and move existing components. Most components can me moved by grabbing their bodies and moving them into position before letting go. Alternately, most components also have legs or corner points that can be moved individually to modify the shape and placement of the component.
Scrolling
Scrolling work for the most part as you would expect from any iOS app, though with one exception. Since the workspace area is already using single-touch gestures for drawing components etc., if you want to pan or tilt (or zoom) the workspace area you have to use two fingers instead on one.
 The parts list
1. You delete a given component by looking up it’s entry in the parts list and giving it a sliding motion towards the left. This brings up a delete option (the exception being the first board component).
2. To specify component properties, like name and value, you tap the “Details” button of the component’s parts list entry. You get a slightly different properties menu depending on the type of component.
 3. Tapping a component entry (not the “Details” button) highlights the given component in the workspace.
The component details
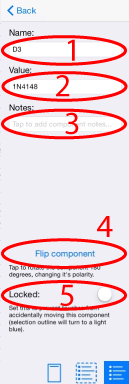
1. The component name has to be unique. When first created a component will be automatically given an appropriate name, but you’re free to change it any time.
2. The value can be anything. Note that the parts list will highlight entries that are missing a value by coloring it slightly red.
3. You can give a component any note you want. It will show next to the component on a multi-page PDF output file, but nowhere else. Or you can ignore this altogether.
4. Components that have a clear orientation, like diodes and electrolytics, or ICs and transistors, have a button that allows you to easily reverse polarity (or rotate 90 degrees in the case of a transistor).
5. Each component can be locked so it can’t be accidentally moved. A locked component, when selected, will highlight with a lighter shade of blue.
The off-board parts list
 The off-board parts list is slightly different from the on-board one in that the off-board parts aren’t represented in the workspace area. Consequently they won’t show up on the circuit drawing, but they will, however, show up in the printed parts list.
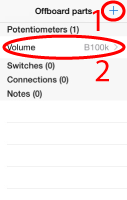
1. Since you can’t draw off-board components they have to be created some other way. Tapping the upper right-hand “+” icon gives you a menu allowing you to create any of the different types of off-board components.
2. Tapping any off-board component entry will bring up the corresponding details menu. Since there’s no component to highlight, tapping any part of the list entry will do.
Exporting a layout
When you’re happy with your layout and want to share it with others (or just make a convenient backup or printed copy for yourself) you probably want to convert it to a widely recognized data format, like a PDF file or a PNG image. The export menu is there to help you with just that.
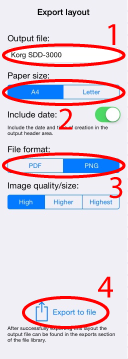
 1. You need to give your export file a name. A reasonable one will be suggested based on the name you gave your lyout file, but you can change it to anything you want (within reason, some special characters aren’t allowed). Note that you can’t specify the file extension; this will be automatically appended based on your choice of output format (3).
2. You can choose whether you want the image or PDF to conform to US or european paper measurements. I can’t imagine it matters much either way, as they’re quite similar, but you never know with a large, compact layout 😉
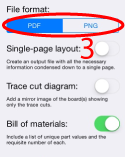
3. Choose the format of your output file; a PNG image or a PDF document. Your choice here will also open up a different set of options for that specific format.
- PNG images can be stored in three different sizes, but will always end up as a compact single-page file.
- PDF documents gives you the choice of single-page (same size and layout as a PNG image) or a multi-page document. The multi-page document will feature a dedicated page for the parts list, and also have options to include a “mirror image” of the trace cuts only and/or a parts sourcing list where each component value is grouped by count.
4. Tapping this button begins the actual process of creating the desired output file. If an output file with the exact same name already exists you will be asked whether to overwrite this or cancel the operation. If you don’t want to overwrite an existing file, change the output file name (1) to something different.
 Specifying layout metadata
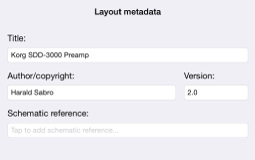
Fill in an appropriate layout title, author and version. These will all turn up in the heading of your exported files, so you should give each of these fields a meaningful value.
The schematic reference can be used for anything you might find useful. Leaving it empty will keep it from showing up on your exported file.
Workspace settings
 The workspace settings menu allows you to configure various settings related to the workspace (…obviously). Though most of these already have accompanying explanation text, I’d like to share my thoughts behind them.
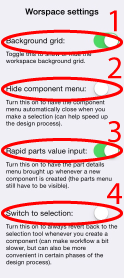
1. Let’s start out by contradicting myself. I don’t have much of a thought behind this one. You can show or hide the background grid. I prefer with, but others may disagree.
2. Enable the “hide component menu” option to have the components menu automatically close after you select a component type. This can save a bit of time and annoyance for those times when you want to draw a number of components of the same type, and only occasionally switch to a different type. I’ve been there so I added the option.
3. The “rapid parts value input” option will automatically bring up the details menu when you create a new component, though the parts list menu still have to be open for it to be of much use. This is an option I typically use in the initial design phase, where I am adding a lot of components and want to quickly add each component’s value as I go. After the initial phase I might turn this option off.
4. Turning on the “switch to selection” option will result in the selection tool always being chosen after you’ve created a new component. This way, when you add a new component you’re ready to make small tweaks in it’s position and size etc. without having to go back to the components menu. I find this useful when I’m in a maintenance phase and want to make only minor changes to an existing layout, or when I’m getting close to finishing a layout and aren’t adding as many new components anymore.
No plans as of now, sorry.
Do you have plans to introduce.a perfboard option? Or does it already exist? I’m really curious as there are so few options for pcb design and none for perf on ipad.
Thanks for your work in either case. 🙂
Any way to make strips rotate 90 degrees? That would be nice.
Excellent suggestion, Travis. I’ve added it to my (long) list of possible improvements.
Is there a way to publish a list of location of various parts. For instance vero guitar layouts have components I can’t seem to find in here at all, but would like to create some layours
Hi Kieran,
I agree that’s an annoying issue to have to deal with. I did think of it, and there’s a “lock” switch available for each and every component. You probably want to edit the board component to lock it down as soon as you know what size you want (you can always unlock it and resize later).
Hi the biggest problem is every time you try select a component you end up. moving the board around. Just fix the board any size don’t matter
Hi Kieran,
Sorry you’re not happy with the state of the app.
I am working on various updates, and I’m also happy for any suggestions.
– I have received requests for a dedicated LED component from others as well, so that is definitely on the TODO-list.
– If not a box for a relay, what would you want a relay-representation to look like? It’s only a box because I have a lack of imagination (and little time).
– What do you mean by showing break-out pins? I don’t come from an EE background; self-taught only.
– I totally get not having to name every component and comment. I do have an UI update in the works which hopefully will address some of this, but I am taking suggestions. There is currently a setting you can toggle to prevent the input dialog from showing when you create a new component. Have you looked at that?
– Sorry you think it’s expensive. There isn’t much I can do for you other than try to provide updates that will make it worthwhile.
Happy for any additional feedback you can give me, as it definitely will help me create a better app!
Hi just downloaded for iPad. Don’t even have an led in components.? Only a box for a relay. Not possible to show break out pin?
At this level I don’t want to have to name every component and comment. Takes too long to add one part!
Not so impressed for expensive app!