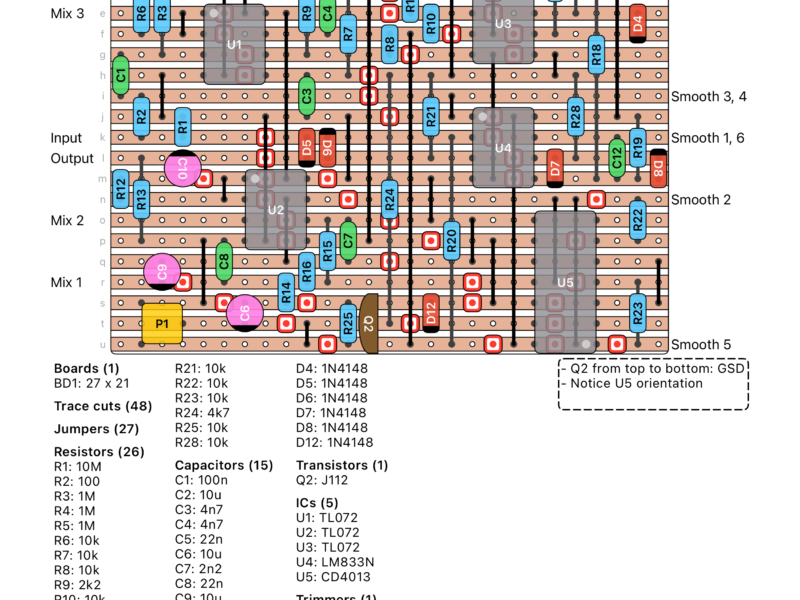
This vero layout is based on a schematic of unknown origin that was posted by choudy over at freestompboxes. Suggested replacements for the Sharp PC419 optocoupler and the original 2206 transistor have both been incorporated. I also chose to not include the original “rat bypass” circuitry and instead add a 1M pull-down resistor at input and change the output resistor to 100k. I haven’t tried building this myself so let me know if you do.
Update (20.01.2013): Yann Robert suggested a few things that needed to be addressed, with which this layout should work. I’ve incorporated the changes, but I couldn’t very well let this old layout stay in the poor shape it was. It’s still not an optimal layout, but at least now the components correspond to the schematic it’s based on. I’m a bit reluctant to call it verified just yet, another independent build would be reassuring.
Update (21.01.2013): Curiosity got the better of me and I had to give this a try last night. Works great, so the “revision 1” layout is hereby confirmed. A big thanks to Yann Robert for the fixes and verification 🙂
Incidentally I believe the switch settings are opposite of what I’ve written on the layout, i.e. “off” is “on” and vice versa, but you’ll easily figure this out once you try it. Not bothering to correct this unless you can convince me otherwise.


I also noticed that on the original, that the tone knob has more influence over its whole sweep. Versus the one I built. My clone’s tone knob only effects the tone on the last third of the sweep. I’m thinking of trying a linear taper just for giggles.
Very cool, Jesse Y
Happy to hear it, and thanks for making the comparison 🙂 Could the slight difference be down to capacitor tolerance? Hmm.
Good day Harald! Great news. I just acquired a Bixonic Expandora and did an A B test. My clone built from your layout performs almost identical to the original. The clone has a bit more midrange bark and slightly less fizz. Which in my humble opinion, is quite favorable. A huge thank you goes out to you.
Jesse Y
I guess If you remove the transistor you eliminate the portion of the circuit that uses the optocoupler to modify gain based on the input signal. It still works because the main audio path is still in operation.
Also, it doesn’t seem as gainy as the YouTube demos I’ve heard. But I admit it does sound pretty good as it is.
Thanks
Hey there Harald!
A quick update.
Upon some further investigation, I discovered that if I pull that transistor out as I’m playing the guitar through the pedal I do get a slight drop in
gain.
http://www.geofex.com/FX_images/expandor.gif
By studying this schematic that I found, I’m guessing that if you pull the “2206” transistor, the signal wouldn’t be stopped just not as amplified. \
Am I right?
Thanks
Jesse Y.
Hey there Harald. Hope all is well. I just finished the Expandora. And it works! However I need to rewire my pots, they’re backwards (oops!) and install an LED. But, I think I may have made a booboo when doing this pedal. Keep in mind it does work, the switches change the overall profile of the clipping, the knobs do what they need to do, again in reverse. I did notice that if I removed the 2N3703 or put it in backwards, the circuit still works. Weird?
Your thoughts on this would be appreciated.
Thanks
Jesse Y.
Hi Jesse Y,
Check out the single line below the list of pots and switches (I know, it’s not easy to spot); “D1 SW 1 -> D2 SW 1”
Hi there everyone at sabrotone. I just finished the veroboard population and was noticed on the layout page that I am short one switch connection? I can figure out the rest of the off board wiring, but I’m fuzzy on the switches. Any help would be very much appreciated.
Thanks
Jesse
Alright. Thank you for your opinion. I’ll use sockets for sure, and I’ll let you know what’s the result with the F1. The datasheet says that the only difference is the voltage breakdown, so it seems to be good. But everybody knows that all is not as simple as it.
Well, I order what’s needed, I build, and I give you some news.
Thank you very much, Harald, for being so “available”.
Cheers from southern France.
Johann
It’s a really finicky circuit so I’m not going to agree with you, but it’s definitely worth a try. Make sure you use an IC socket so you can swap it out later in case it doesn’t work.
Hi Harald,
Think I’m gonna build one… I have a H11F1, I could use it i stead of the F3, right ?
Thanks for your help.
Johann
Excellent news! I’ll make sure to update the layout accordingly. And maybe I have to try building this myself now.
VERIFIED but some mods to made. I’m French, so sorry for my bad English. At first, pots are inversed (pin 1 = pin 3). Contrary to Mark L. I don’t change Gain pot. There was a really bug but it wasn t the pot. It s the capacitor C9 which must be a no-polarized and not an electrolyte. To finish the transistor isn’t in the good orientation. Reverse to 180°.
When you’ve made all these mods, it works great!
That’s great! I’ve had this one unverified for a long time. Thanks Mark!
I’ll try to fix up the layout with your suggestions soon as I can.
This is verified except for a few things: All of the pots are backwards, I used a B250k pot for gain – the listed value was too large and there was no sweep, and I used two dpdt switches instead of the dip switch. Im fairly certain I have the switches hooked up right but Im not entirely sure. This thing sounds AWESOME. I love it.