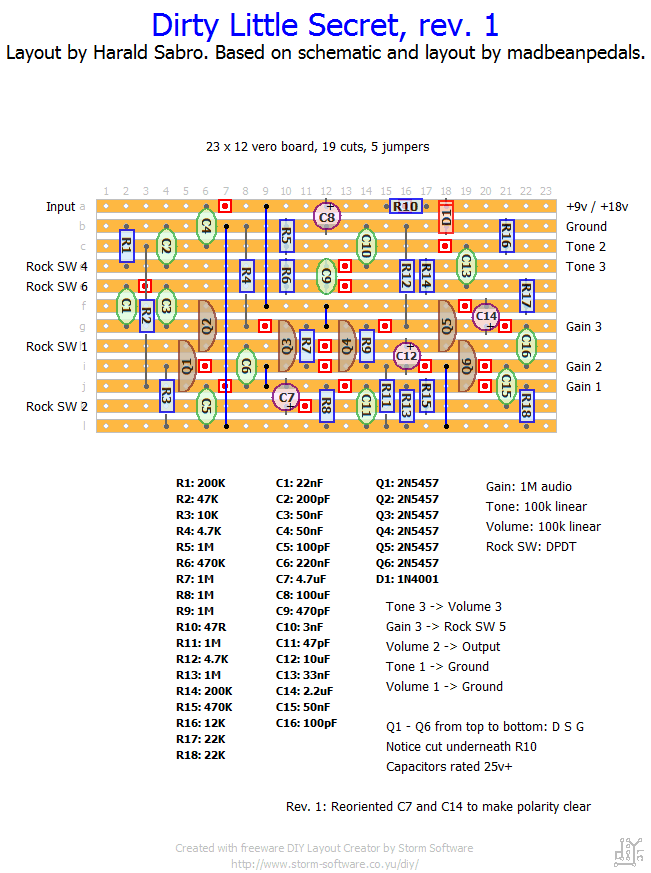
Ordered a PCB from madbeanpedals, and decided to make a vero layout while I wait for it to arrive in the mail.

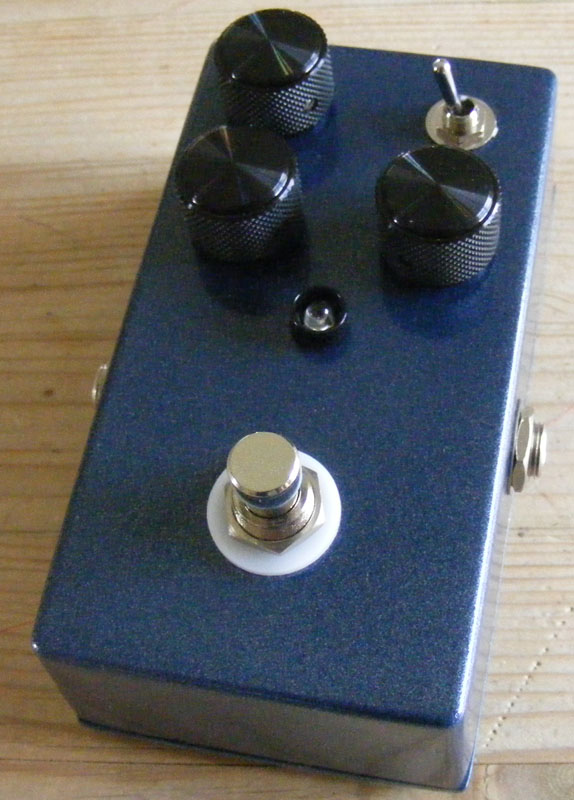
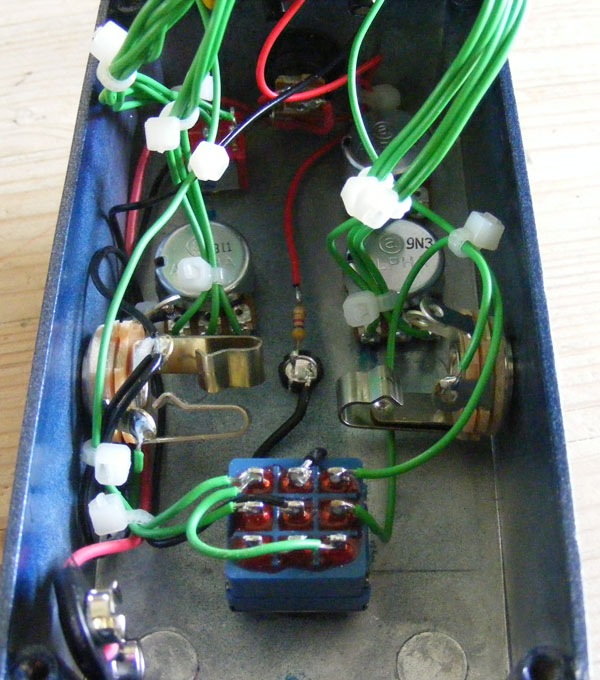
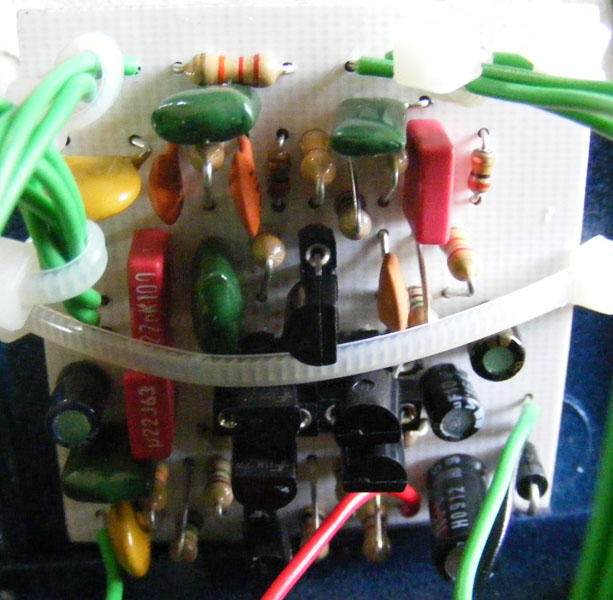
Update (07.06.2010): Received my Dirty Little Secret PCB from www.madbeanpedals.com a few days ago and quickly populated it, boxed it and tried it. Not as hairy as I had imagined, but still an interesting effect. Will have to give it another go soon.
Update (20.10.2011): Fixed dead picture links.


Thanks Harald for the layout – I’ve built this recently and it sounds great. Had no 2n5457’s left, so used a mixture of 2n5484 and mpf102 – couldn’t use only one or the other as it didn’t have enough gain, and had to swap them around a lot before I found the best positions, but got there in the end.
Built one today, sounds great! Thanx!
Hi Guys
Thanks Alex..a great help,,, and many thanks to you too Harald
Great link there from Alex. I’ve also got a few illustrations in the “schematics & drawings” section.
Hi Tim,
It’s lug 4.
You can find all your answers here:
http://www.beavisaudio.com/techpages/Switches/
Hi Harald
Can you help me out with this ..DPDT pin/lug numbering…now if I assume top left is lug 1…what is the lug directly to the right..is it lug 4 or lug 6..can never remember the sequence..I know I really should be able to work it out by now lol
Ive tried looking it up but never get a straight answer, regards Tim
Thanks a lot Harald for all the valuable info.
Hi rizroy. I’m guessing your squealing issue is due to positive feedback. Try keeping the switch wiring (and all wiring really) short and away from other wires (cross at 90 degree angles if necessary). In other words follow common wiring practices for any high gain or noisy effect (plenty of talk on the forums if you search a bit).
Switching it for a stomp switch with LED should be no problem. Use a 3PDT and connect the first two poles as you would the toggle switch, and use the last pole for lighting your LED a la what you normally do when wiring a stomp switch for true-bypass.
If you want to do a little bit more elaborate LED indication you can:
– Connect the anodes of two LEDs to +9v.
– Connect the cathode of one LED to either outer lug of the last pole, nad the other LED cathode to the other outer lug.
– Connect the center lug, via a LED resistor, to the same lug on your on/off 3PDT where you connect the main indicator LED cathode (lug 4 in my builds).
You should now have two indication LEDs tied to the rock/rawk switch, and only one of them should light up based on the switch setting. And if you put the effect in bypass both will be off. (If you want the switch indicator LEDS to light even when the effect is in bypass you connect the center lug (via a resistor) straight to ground instead of to the on/off switch.
I would also like to know, how can I replace the DPDT switch with a Footswitch and LED indication showing which mode I am in.
Hi Harald.. this works fine but at many times when I switch to either rock or rawk mode it gives out very loud, high pitched squeal and nothing else….what could be causing it? any ideas?
I’d check C7 on the layout for a short, or whether the signal gets lost across C1 (bad wire, cold solder etc.?).
Built it, but it is working only on one position of the dpdt switch the other position is completely off-no signal. From what I hear I believe the rock position is working while the heavier gain position is off. Any idea what could be causing it and how to rectify it? What to check? what to change? please help out ….
I built this recently and I have to say, I’m really liking it. Out of the 5 overdrives that I have built from your layouts, this one is just overall my favorite ( so far haha ). I find that some of the others sound good at a particular place on the overdrive level but not so much at other places. This overdrive sounds really good at light overdrive levels or heavier overdrive settings. Sounds good with humbuckers or single coils too. Really pleased. I did install a socket for c16 so I could try the 5nf cap as well. I think the 5nf was supposed to be brighter and give a little more gain, but to tell the truth I didn’t hear much of a difference.
I will add that this build didn’t work right after I completed it. I was getting ready to start from scratch but took one last look at my board. Noticed one cap that seemed kind of physically large in comparing to the layout. I had used a 200nf for c2 instead of a 200pf – off by a factor of 1000! Replaced with the proper value and it worked like a charm. Sometimes a redo is the only way but sometimes its just that one little component that will throw the whole thing off!
As always, Thanks Harald! Think I’m trying the OKKO next……
I notice the article/forum posts talk about switching the cap that’s between lugs #1 and #2, but there might not be a standard way in which pot lugs are counted. I’ve got the 100pF cap across what -I- call lugs #2 and #3 (and am under the impression this is the standard way of numbering pot lugs), so if you go by my layout you should work with these lugs and not #1/#2. I put up a picture in the “schematics & drawings” section showing how I number my lugs.
Thanks Harald, I’ll give your build a go and experiment with the cap switching. Catalinbread are saying there’s a sweet spot for the gain cap of either up to 200pf or greater than 5nf. Anything between not so great. I’ll have a go at the on-off-on with a 100pf in the middle for stock and a 50 to 100pf on one throw and 5nf on the other throw. Thanks again.
Alright. This would be an easy mod.
Solder one leg of a 5nF cap to “Gain” lug #1 and the other 5nF cap leg to an SPST/SPDT switch lug #1, then finish up by connecting a wire from switch lug #2 to “Gain” lug #2. Now you can switch the 5nF(5000pF) cap on and off with the switch.
If you want to take it a step further: Get a DPDT on-off-on switch, wire switch lugs #2 and #5 to “Gain” lugs #1 and #2 respectively, then solder the 5nF cap across switch lugs #1 and #4, and the 100pF/200pF cap across switch lugs #3 and #6. Now you’ll have stock setting wit hthe switch in middle position and one of the caps on with the switch engaged to either side.
I have just had a closer look. It looks like the fixed c16 (100pf) is from v1 of the DLS. The v2 slider switch adds a 5000pf cap in parallel. See post #31:
http://www.thegearpage.net/board/showthread.php?t=630187&page=3
Don’t think so, although it’s been a while since I had a look at this effect.
Hey Harald, thanks for posting this, looks great and I’ll give it a go. Just a question, is this the V2 of the DLS with the switch for the 5000pf cap across the gain lugs.
Hello harald, the layout is working nice job man!!
Well i use audio taper for all of them it sounds really good im nt kidding its damn good and versatile!
Time to play more!
Keep doing more layout ya and i keep building them! Hehe.
Just had a second look at the layout and I’m fairly confident it’s correct. Good luck with your build!
PS! You can always get a PCB from http://www.madbeanpedals.com
I haven’t verified it yet, sorry, but I’ll double check everything for you today. If you build it, let me know if it works.
Hey harald, is the dls verified? or u are confident that the layout should hv no issues whatsoever?
I wan to build ur layout, yours look very easy to the eyes.
Hehe..