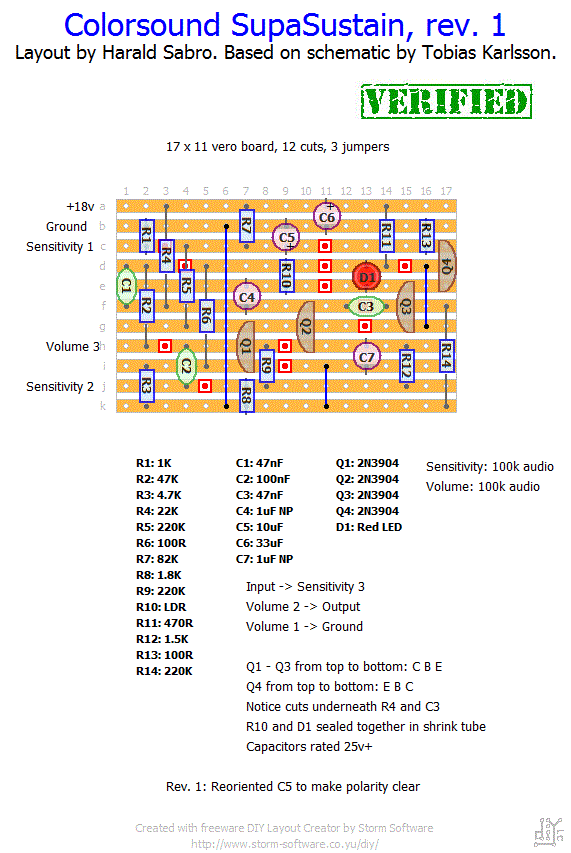
Here’s a vero layout for another compressor; the ColorSound (SolaSound) SupaSustain. Note that this one runs on +18V and won’t work with a regular +9V battery.

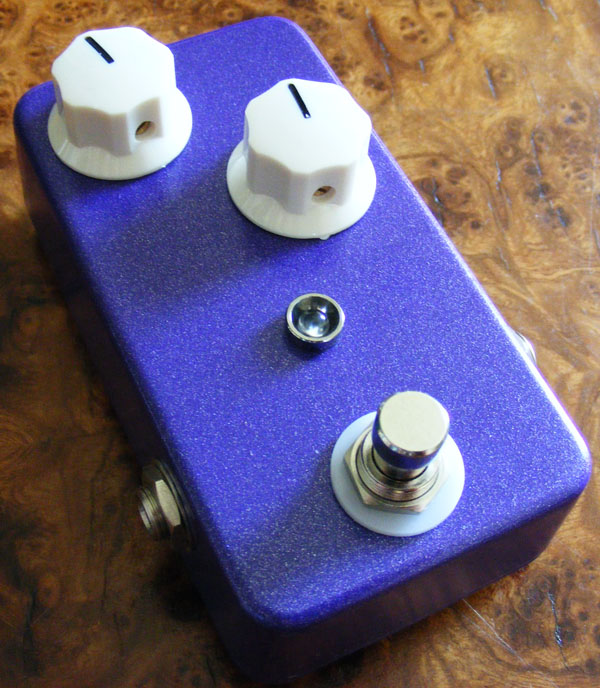
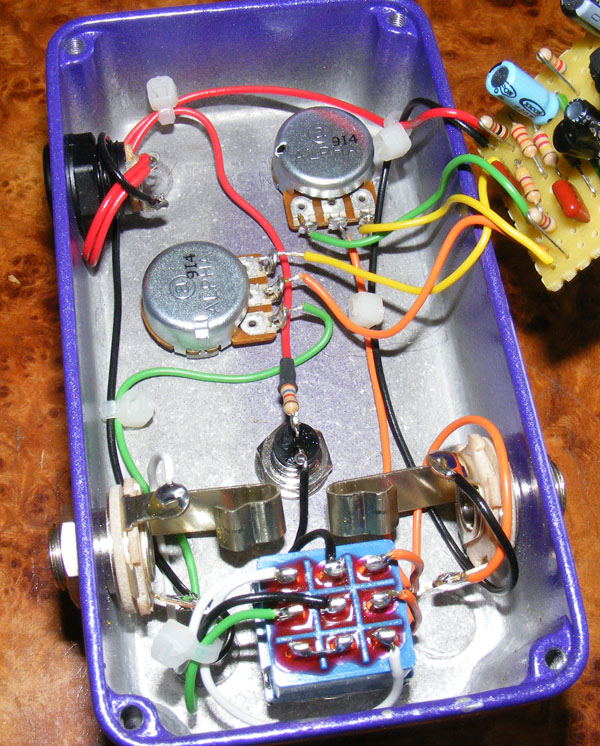
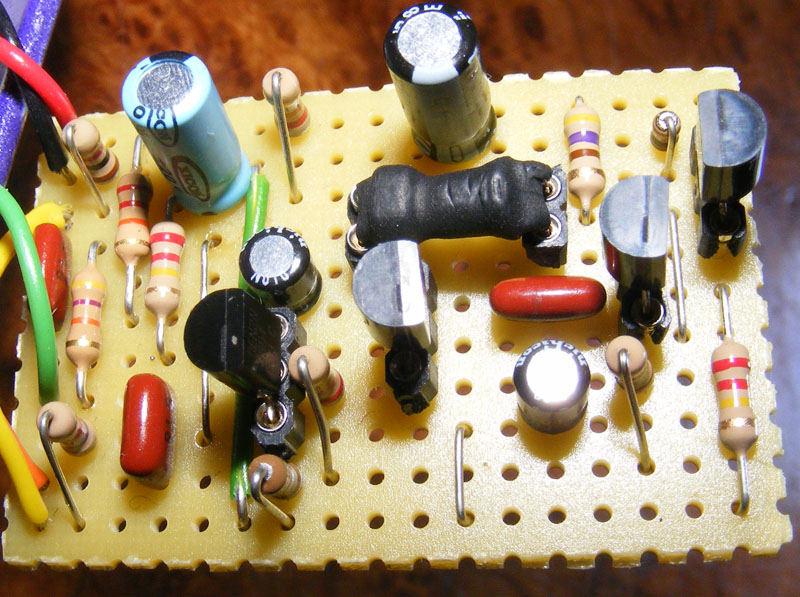
Update (04.09.2010): Finished the SupaSustain build the other day and here’s the result. Haven’t had much time to play with it yet, but first impression is very good. That thing in the middle of the board is a regular optoresistor and a 5mm red LED wrapped in a shrink tube, same as on the Baja Trembulator. And remember to feed this compressor +18V.


Ed, it’s really hard to predict (read, I still haven’t fully understood it) how a specific optocoupler is going to behave in a given circuit. They are so many different ones with varying properties. Give it a try 😉
Hi Harald
I have an extra vlt5c3 opto
Do you think it would worh well in thes circuit
Thanks
Ed
I don’t actually know what LDR to use. I used a 9200 from smallbear with a resistance ranging from ~10k to 5M. Try several ones and go with the one you like best.
Hello,
I would like to know what value to use for LDR ?
I use an LDR that has a value between 8K and 20K
Does the value is good ?
Tank you.
Hi Harald,
I suspected that that was the case with R6 and C5. Thanks for the reply. I have one more question about the caps. Can I replace the electrolytic 1uf NP caps with a regular 1uf box style cap? If not is there an easier replacement or another way? I am having a hard time getting the parts I need for this. Thanks so much!
Mike
Hi, Mike.
For R6 I used one of those tiny 1/8W resistors (no real reason other than that’s what I had at the time) and the component body is hidden behind the transistor. C5 is that blue electrolytic you see to the left a bit. I moved it there because the LED/LDR was a bit bulky.
Hi Harald,
I was just wondering about the inconsistencies between your “gut shot” pic and your vero on the Supa Sustain. Specifically R6 and C5. Thanks so much!
Thanks a lot Harald; that helps a lot!
Yes, you need the trace cuts between R10 and D1. You want the legs of the opto-resistor part and the legs of the LED part to connect with different parts of the circuit. Then you bend them towards each other in a 90 degree arc and seal them together to prevent outside light from interfering. Of course, I find it easier to start with the shrink tubing, then carefully bend the legs to fit the board. If you also add sockets to the board you can easily re-seal the two components if you don’t get it right the first time around. Remember to observe the polarity of the LED, which can get tricky once you seal it in black tubing.
Think of the two components as an IC, you don’t (usually) want the legs on one side to short with the legs on the other side.
If you use a VTL5C2 or similar (I’ve never actually worked with one myself) the cuts still apply. You’ve got the “same” opto-resistor/LED, only it’s professionally packaged.
Oh, also do those trace cuts still apply?
Hi Harald, just as an FYI to the people asking about sound clips, you can usually find clips of originals and some clones at YouTube. For example, that’s why I’m not looking at some things like the Heliotrope until a later date. Too much other cool stuff!
I was wondering, I see in the pics of this (SupaSustain) that you have the 5mm LED and the Opto resistor joined together with shrink wrap around them, but don’t see the joining of them reflected in the layout; if fact, it looks like they’re separated by trace cuts. Since your build photo shows them combined, I assume it is that way though. When I built a Tonepad Optical Compressor, I used instead of the Optical resistor/LED combo a VTL5C2. I’m guessing I could probably do that here too? Thanks, Matt
Hi, Pedro.
Afraid I haven’t gotten around to making any sound clips yet, although this is on my to-do list.
The build shouldn’t be to hard, but do note you either need an +18v power supply or two +9v batteries in series to power this thing (I opted for the power supply to be able to fit it in a small enclosure).
Hi man!
It looks very good your supasustain!
Did you record any test of this? It seems to be an easy project for beginners like me, but first it’d be cool to listen a finished supasustain! ^^
Greets from Spain! ;D